Build your first CocoIndex project
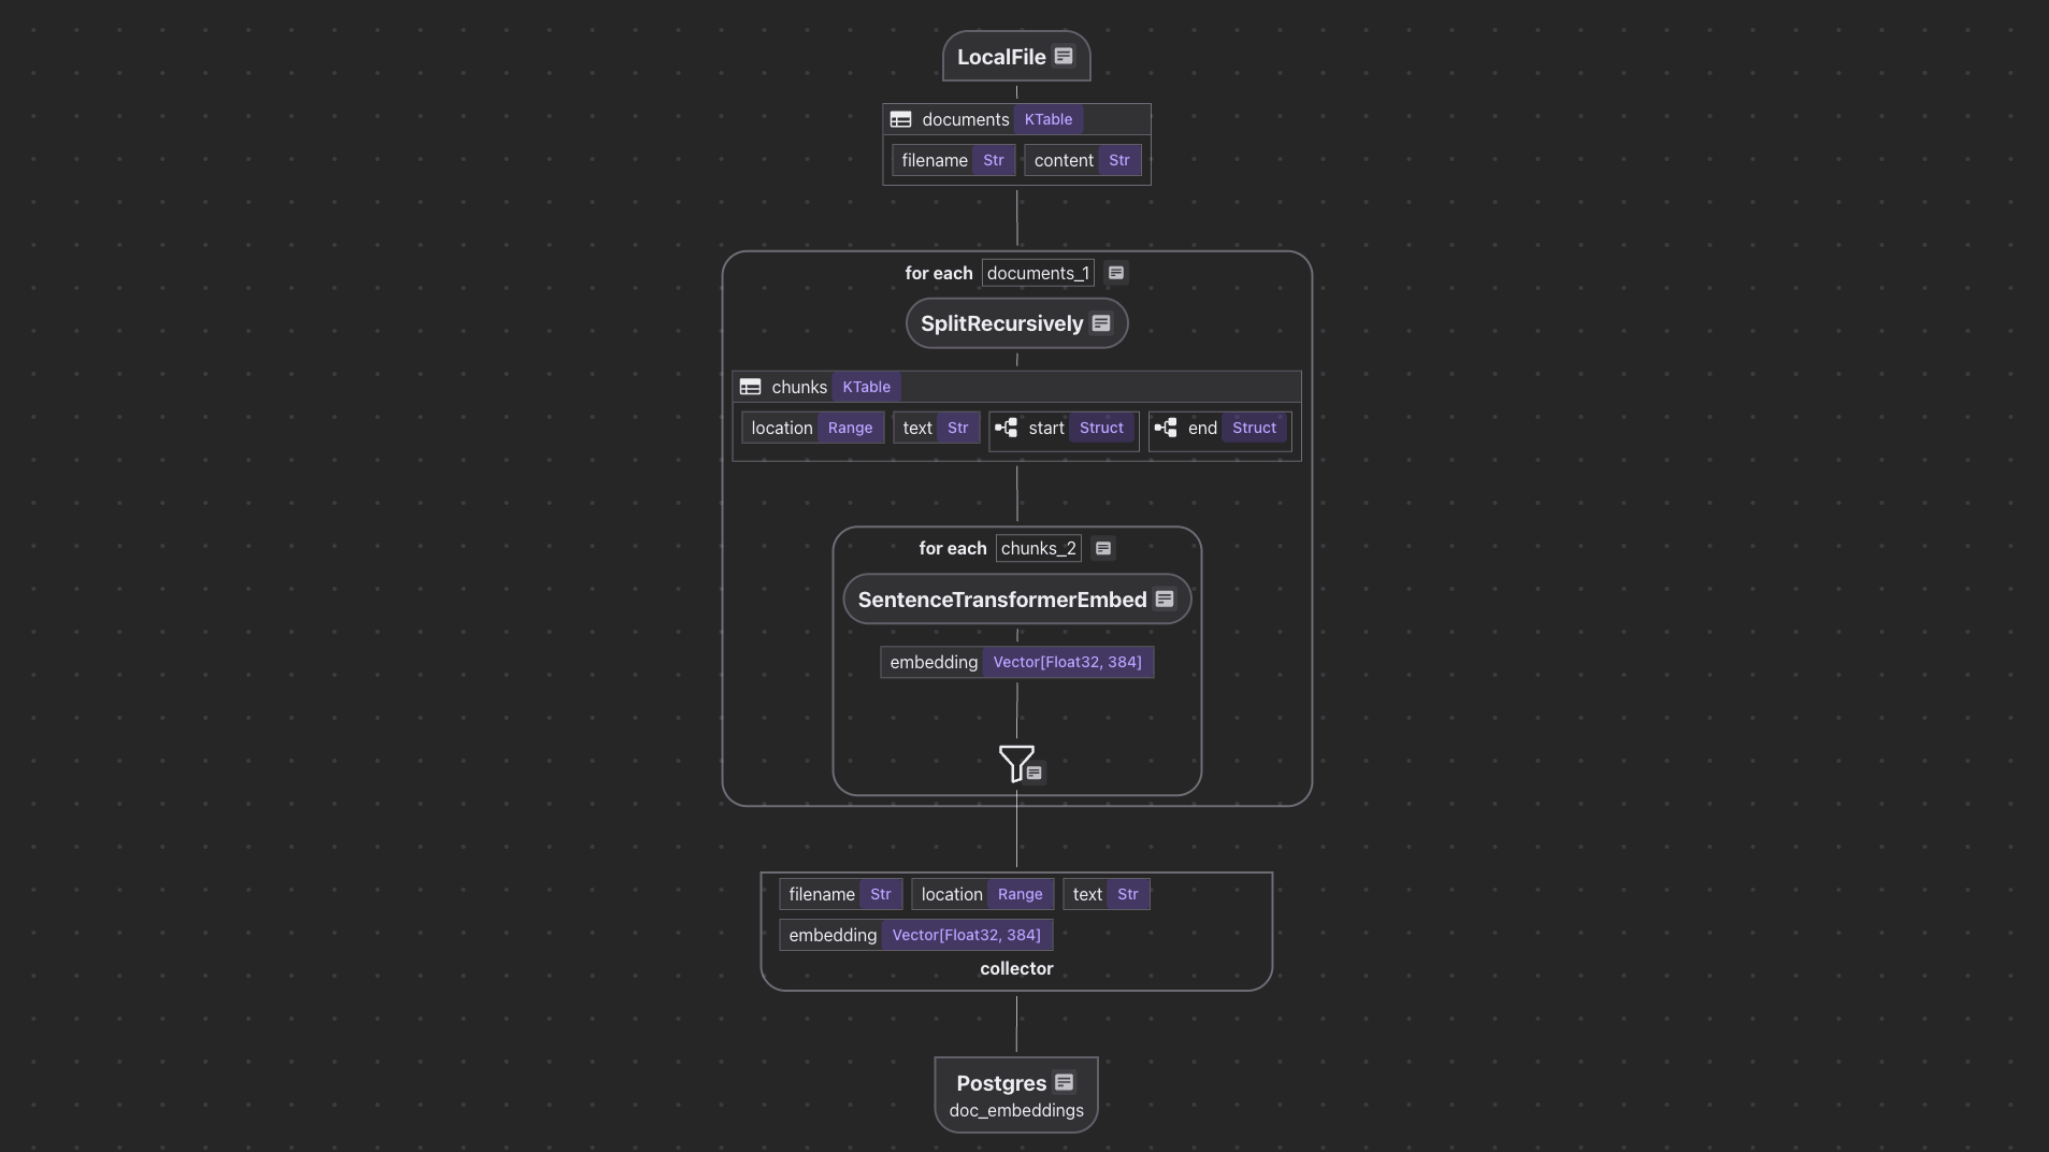
This guide will help you get up and running with CocoIndex in just a few minutes, that does:
- Read files from a directory
- Perform basic chunking and embedding
- loads the data into a vector store (PG Vector)
Prerequisite: Install CocoIndex environment
We'll need to install a bunch of dependencies for this project.
-
Install CocoIndex:
pip install -U cocoindex
-
You can skip this step if you already have a Postgres database with pgvector extension installed. If not, the easiest way is to bring up a Postgres database using docker compose:
- Make sure Docker Compose is installed: docs
- Start a Postgres SQL database for cocoindex using our docker compose config:
docker compose -f <(curl -L https://raw.githubusercontent.com/cocoindex-io/cocoindex/refs/heads/main/dev/postgres.yaml) up -d
Step 1: Prepare directory for your project
-
Open the terminal and create a new directory for your project:
mkdir cocoindex-quickstart
cd cocoindex-quickstart -
Prepare input files for the index. Put them in a directory, e.g.
markdown_files
. If you don't have any files at hand, you may download the example markdown_files.zip and unzip it in the current directory.
Step 2: Define the indexing flow
Create a new file quickstart.py
and import the cocoindex
library:
import cocoindex
Then we'll create the indexing flow as follows.
@cocoindex.flow_def(name="TextEmbedding")
def text_embedding_flow(flow_builder: cocoindex.FlowBuilder, data_scope: cocoindex.DataScope):
# Add a data source to read files from a directory
data_scope["documents"] = flow_builder.add_source(
cocoindex.sources.LocalFile(path="markdown_files"))
# Add a collector for data to be exported to the vector index
doc_embeddings = data_scope.add_collector()
# Transform data of each document
with data_scope["documents"].row() as doc:
# Split the document into chunks, put into `chunks` field
doc["chunks"] = doc["content"].transform(
cocoindex.functions.SplitRecursively(),
language="markdown", chunk_size=2000, chunk_overlap=500)
# Transform data of each chunk
with doc["chunks"].row() as chunk:
# Embed the chunk, put into `embedding` field
chunk["embedding"] = chunk["text"].transform(
cocoindex.functions.SentenceTransformerEmbed(
model="sentence-transformers/all-MiniLM-L6-v2"))
# Collect the chunk into the collector.
doc_embeddings.collect(filename=doc["filename"], location=chunk["location"],
text=chunk["text"], embedding=chunk["embedding"])
# Export collected data to a vector index.
doc_embeddings.export(
"doc_embeddings",
cocoindex.storages.Postgres(),
primary_key_fields=["filename", "location"],
vector_indexes=[
cocoindex.VectorIndexDef(
field_name="embedding",
metric=cocoindex.VectorSimilarityMetric.COSINE_SIMILARITY)])
Notes:
-
The
@cocoindex.flow_def
declares a function to be a CocoIndex flow. -
In CocoIndex, data is organized in different data scopes.
data_scope
, representing all data.doc
, representing each row ofdocuments
.chunk
, representing each row ofchunks
.
-
A data source extracts data from an external source. In this example, the
LocalFile
data source imports local files as a KTable (table with a key field, see KTable for details), each row has"filename"
and"content"
fields. -
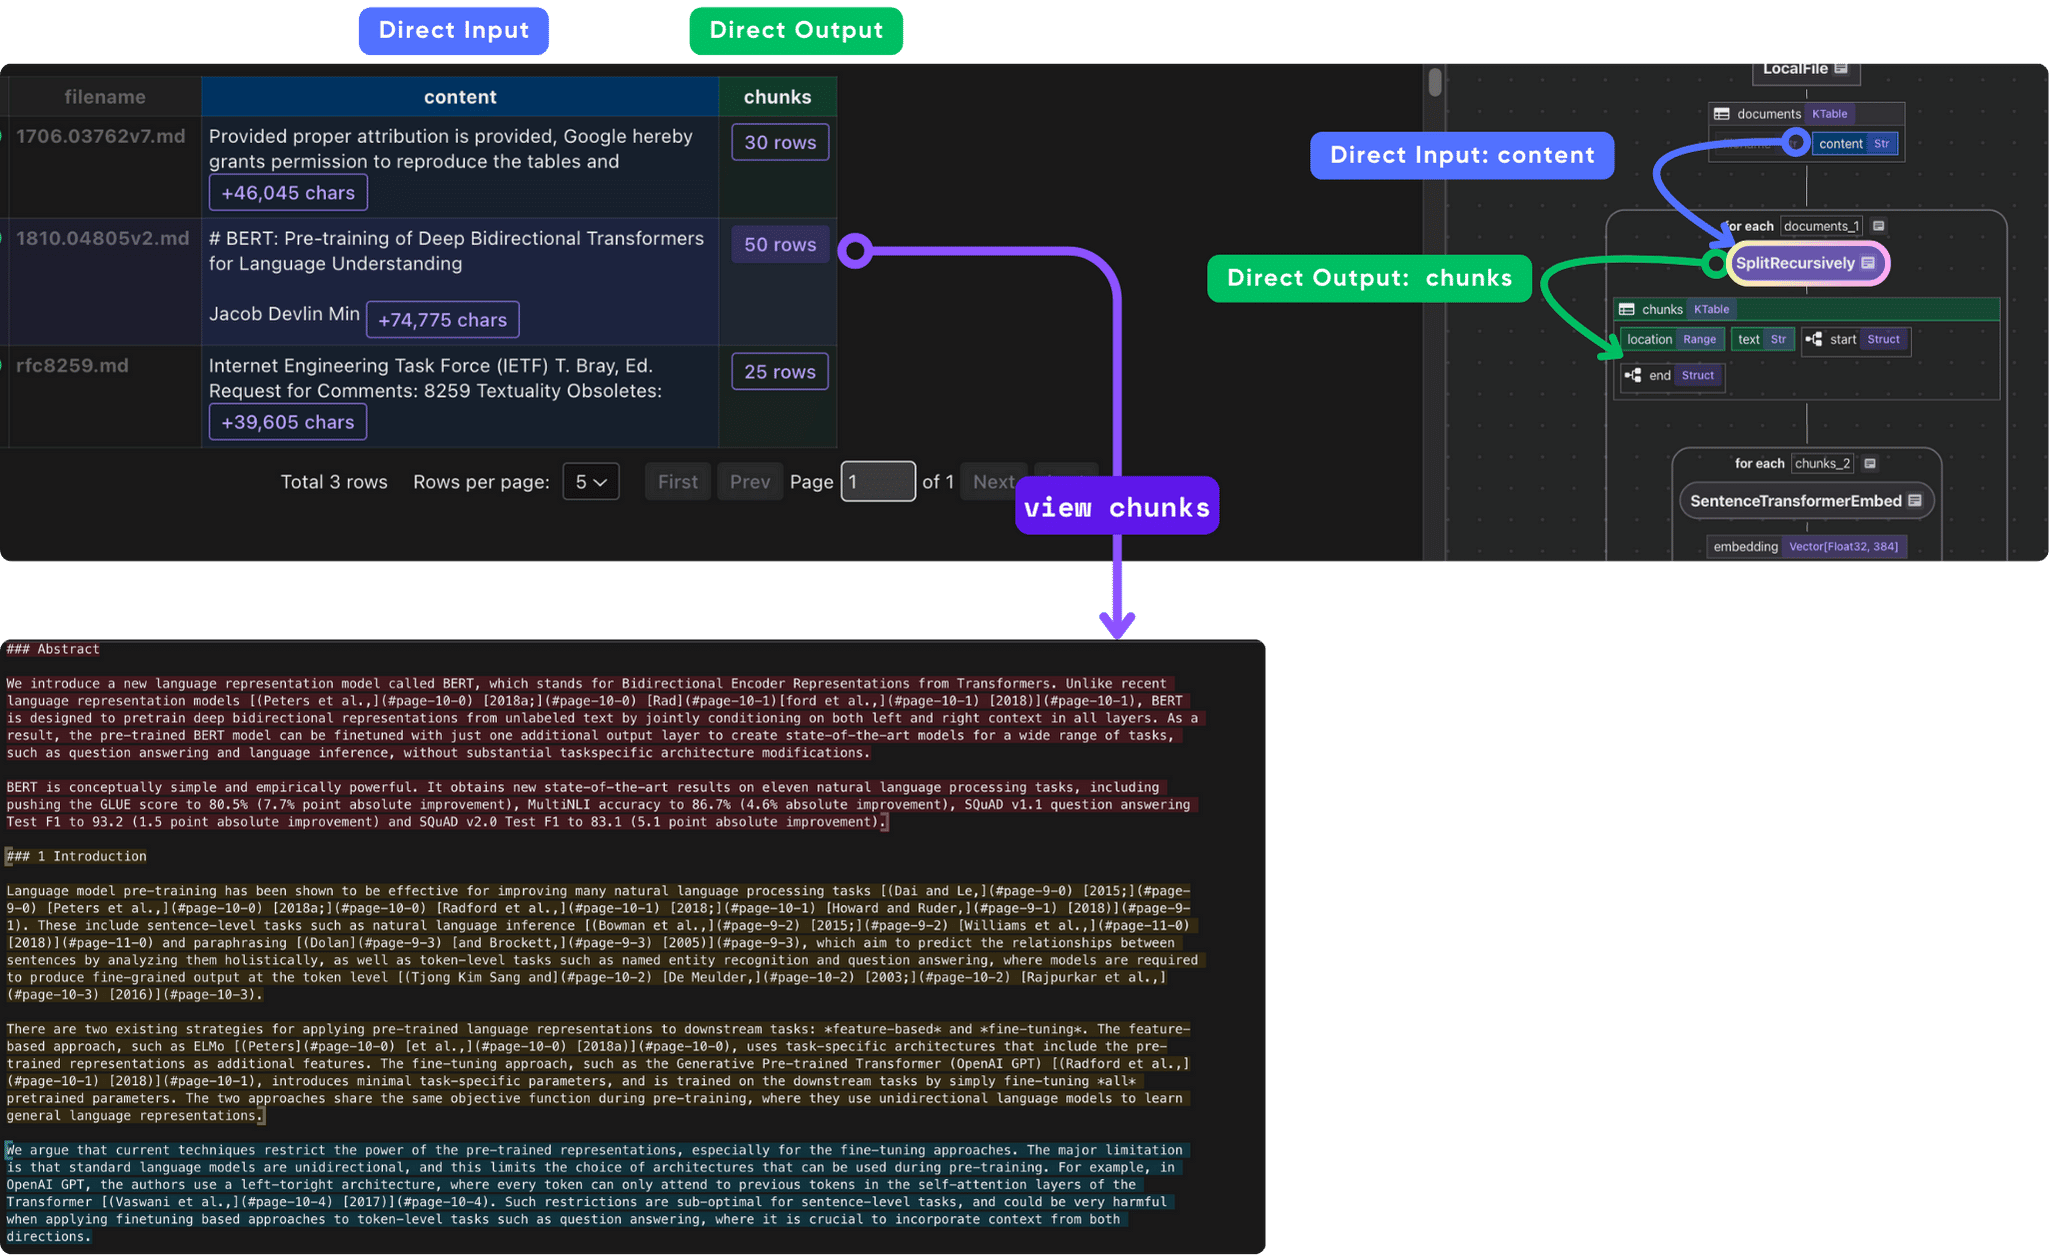
After defining the KTable, we extended a new field
"chunks"
to each row by transforming the"content"
field usingSplitRecursively
. The output of theSplitRecursively
is also a KTable representing each chunk of the document, with"location"
and"text"
fields. -
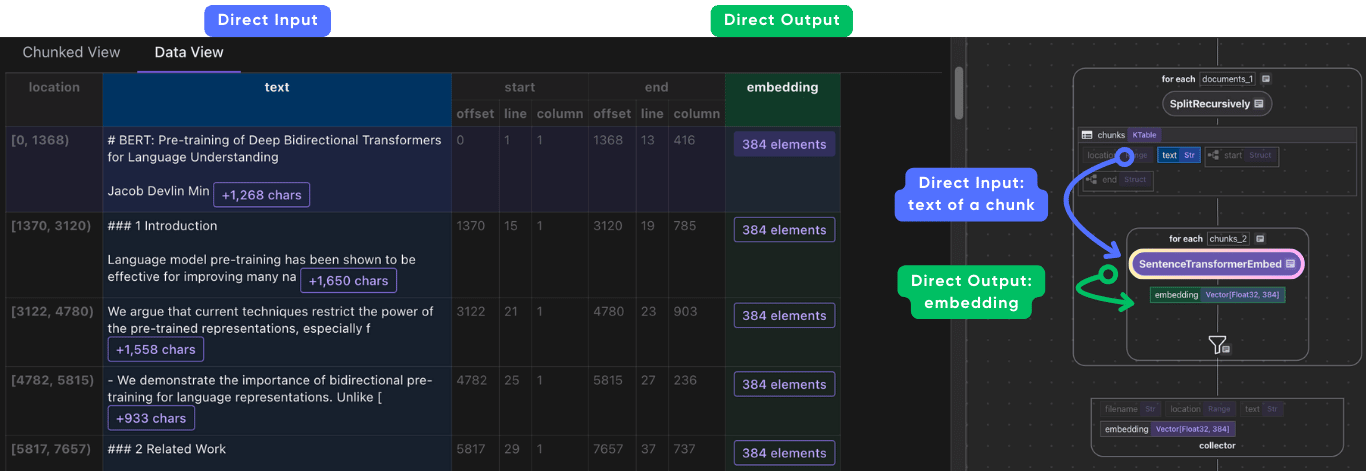
After defining the KTable, we extended a new field
"embedding"
to each row by transforming the"text"
field usingSentenceTransformerEmbed
. -
In CocoIndex, a collector collects multiple entries of data together. In this example, the
doc_embeddings
collector collects data from allchunk
s across alldoc
s, and using the collected data to build a vector index"doc_embeddings"
, usingPostgres
.
Step 3: Run the indexing pipeline and queries
Specify the database URL by environment variable:
export COCOINDEX_DATABASE_URL="postgresql://cocoindex:cocoindex@localhost:5432/cocoindex"
Step 3.1: Setup the index pipeline
We need to setup the index:
cocoindex setup quickstart.py
Enter yes
and it will automatically create a few tables in the database.
Now we have tables needed by this CocoIndex flow.
Step 3.2: Build the index
Now we're ready to build the index:
cocoindex update quickstart.py
It will run for a few seconds and output the following statistics:
documents: 3 added, 0 removed, 0 updated
Step 4 (optional): Run queries against the index
CocoIndex excels at transforming your data and storing it (a.k.a. indexing). The goal of transforming your data is usually to query against it. Once you already have your index built, you can directly access the transformed data in the target database. CocoIndex also provides utilities for you to do this more seamlessly.
In this example, we'll use the psycopg
library along with pgvector to connect to the database and run queries on vector data.
Please make sure the required packages are installed:
pip install numpy "psycopg[binary,pool]" pgvector
Step 4.1: Extract common transformations
Between your indexing flow and the query logic, one piece of transformation is shared: compute the embedding of a text. i.e. they should use exactly the same embedding model and parameters.
Let's extract that into a function:
from numpy.typing import NDArray
import numpy as np
@cocoindex.transform_flow()
def text_to_embedding(text: cocoindex.DataSlice[str]) -> cocoindex.DataSlice[NDArray[np.float32]]:
return text.transform(
cocoindex.functions.SentenceTransformerEmbed(
model="sentence-transformers/all-MiniLM-L6-v2"))
cocoindex.DataSlice[str]
represents certain data in the flow (e.g. a field in a data scope), with type str
at runtime.
Similar to the text_embedding_flow()
above, the text_to_embedding()
is also to constructing the flow instead of directly doing computation,
so the type it takes is cocoindex.DataSlice[str]
instead of str
.
See Data Slice for more details.
Then the corresponding code in the indexing flow can be simplified by calling this function:
...
# Transform data of each chunk
with doc["chunks"].row() as chunk:
# Embed the chunk, put into `embedding` field
chunk["embedding"] = text_to_embedding(chunk["text"])
# Collect the chunk into the collector.
doc_embeddings.collect(filename=doc["filename"], location=chunk["location"],
text=chunk["text"], embedding=chunk["embedding"])
...
The function decorator @cocoindex.transform_flow()
is used to declare a function as a CocoIndex transform flow,
i.e., a sub flow only performing transformations, without importing data from sources or exporting data to targets.
The decorator is needed for evaluating the flow with specific input data in Step 4.2 below.
Step 4.2: Provide the query logic
Now we can create a function to query the index upon a given input query:
from psycopg_pool import ConnectionPool
from pgvector.psycopg import register_vector
def search(pool: ConnectionPool, query: str, top_k: int = 5):
# Get the table name, for the export target in the text_embedding_flow above.
table_name = cocoindex.utils.get_target_storage_default_name(text_embedding_flow, "doc_embeddings")
# Evaluate the transform flow defined above with the input query, to get the embedding.
query_vector = text_to_embedding.eval(query)
# Run the query and get the results.
with pool.connection() as conn:
register_vector(conn)
with conn.cursor() as cur:
cur.execute(f"""
SELECT filename, text, embedding <=> %s AS distance
FROM {table_name} ORDER BY distance LIMIT %s
""", (query_vector, top_k))
return [
{"filename": row[0], "text": row[1], "score": 1.0 - row[2]}
for row in cur.fetchall()
]
In the function above, most parts are standard query logic - you can use any libraries you like. There're two CocoIndex-specific logic:
-
Get the table name from the export target in the
text_embedding_flow
above. Since the table name for thePostgres
target is not explicitly specified in theexport()
call, CocoIndex uses a default name.cocoindex.utils.get_target_storage_default_name()
is a utility function to get the default table name for this case. -
Evaluate the transform flow defined above with the input query, to get the embedding. It's done by the
eval()
method of the transform flowtext_to_embedding
. The return type of this method isNDArray[np.float32]
as declared in thetext_to_embedding()
function (cocoindex.DataSlice[NDArray[np.float32]]
).
Step 4.3: Add the main script logic
Now we can add the main logic to the program. It uses the query function we just defined:
if __name__ == "__main__":
# Initialize CocoIndex library states
cocoindex.init()
# Initialize the database connection pool.
pool = ConnectionPool(os.getenv("COCOINDEX_DATABASE_URL"))
# Run queries in a loop to demonstrate the query capabilities.
while True:
try:
query = input("Enter search query (or Enter to quit): ")
if query == '':
break
# Run the query function with the database connection pool and the query.
results = search(pool, query)
print("\nSearch results:")
for result in results:
print(f"[{result['score']:.3f}] {result['filename']}")
print(f" {result['text']}")
print("---")
print()
except KeyboardInterrupt:
break
It interacts with users and search the database by calling the search()
method created in Step 4.2.
Step 4.4: Run queries against the index
Now we can run the same Python file, which will run the new added main logic:
python quickstart.py
It will ask you to enter a query and it will return the top 10 results.
Next Steps
Next, you may want to:
- Learn about CocoIndex Basics.
- Learn about other examples in the examples directory.
- The
text_embedding
example is this quickstart. - Pick other examples to learn upon your interest.
- The