Extracting Structured Data from Patient Intake Forms with DSPy and CocoIndex


Patient intake forms are indeed a rich source of structured clinical data, but traditional OCR + regex pipelines fail to reliably capture their nested, conditional, and variable structure, leaving most of that value locked in unstructured text or manual entry.
In today's example, we are going to show how to extract clean, typed, Pydantic-validated structured data directly from PDFs, using:
- DSPy (for multimodal structured extraction with Gemini 2.5 Flash vision)
- CocoIndex (for incremental processing, caching, and database storage)
No manual text extraction, no brittle markdown conversion — just connect to source, transform the PDFs, and get validated patient models out, and ready to go in production.
The entire code is open sourced with Apache 2.0 license. To see more examples build with CocoIndex, you could refer to the examples page.
⭐ Star the project if you find it helpful!

Why DSPy + CocoIndex?
Before jumping in, here’s what each component contributes:
DSPy: A programming framework for LLMs
Traditional LLM apps rely on prompt engineering: you write a prompt with instructions, few‑shot examples, and formatting, then call the model and parse the raw text. This approach is fragile:
- Small changes in the prompt, model, or data can break the output format or quality.
- Logic is buried in strings, making it hard to test, compose, or version.
DSPy replaces this with a programming model: you define what each LLM step should do (inputs, outputs, constraints), and the framework figures out how to prompt the model to satisfy that spec.
CocoIndex: An ultra performant data processing engine for AI workloads
CocoIndex is an ultra performant compute framework for AI workloads, with incremental processing. Users write simple in-memory computations in Python and coco runs it as a resilient, scalable data pipeline (with Rust Engine) – with fresh data always ready for serving. Same flow definition you use in a notebook can be lifted easily into production.
With CocoIndex, changes in sources or transformation logic only trigger minimal recompute, cutting cold-start “backfill” latencies from hours to seconds while reducing GPU/API spend. In production, this manifests as always-fresh targets: you run in “live” mode with change data capture or polling, and CocoIndex keeps derived stores in sync with complex unstructured sources like codebases, PDFs, and multi-hop API compositions.
Because every transformation step is observable with lineage, teams get auditability and explainability out of the box, which helps for regulated scenarios like healthcare extraction or financial workflows.
DSPy & CocoIndex synergy
The synergy shows up most clearly in end-to-end AI data products: DSPy defines robust, typed extractors or decision modules, and CocoIndex wires them into a resilient, incremental pipeline that can meet SLOs and compliance needs. Any change in documents, code, or business rules is reflected quickly and explainably in the targets and features those agents consume.
Flow overview
Prerequisites
Before getting started, make sure you have the following set up:
- Install Postgres if you don't have one, ensure you can connect to it from your development environment.
- Python dependencies
pip install -U cocoindex dspy-ai pydantic pymupdf
- Create a
.envfile:
# Postgres database address for cocoindex
COCOINDEX_DATABASE_URL=postgres://cocoindex:cocoindex@localhost/cocoindex

# Gemini API key
GEMINI_API_KEY=YOUR_GEMINI_API_KEY
Pydantic models: Define the structured schema
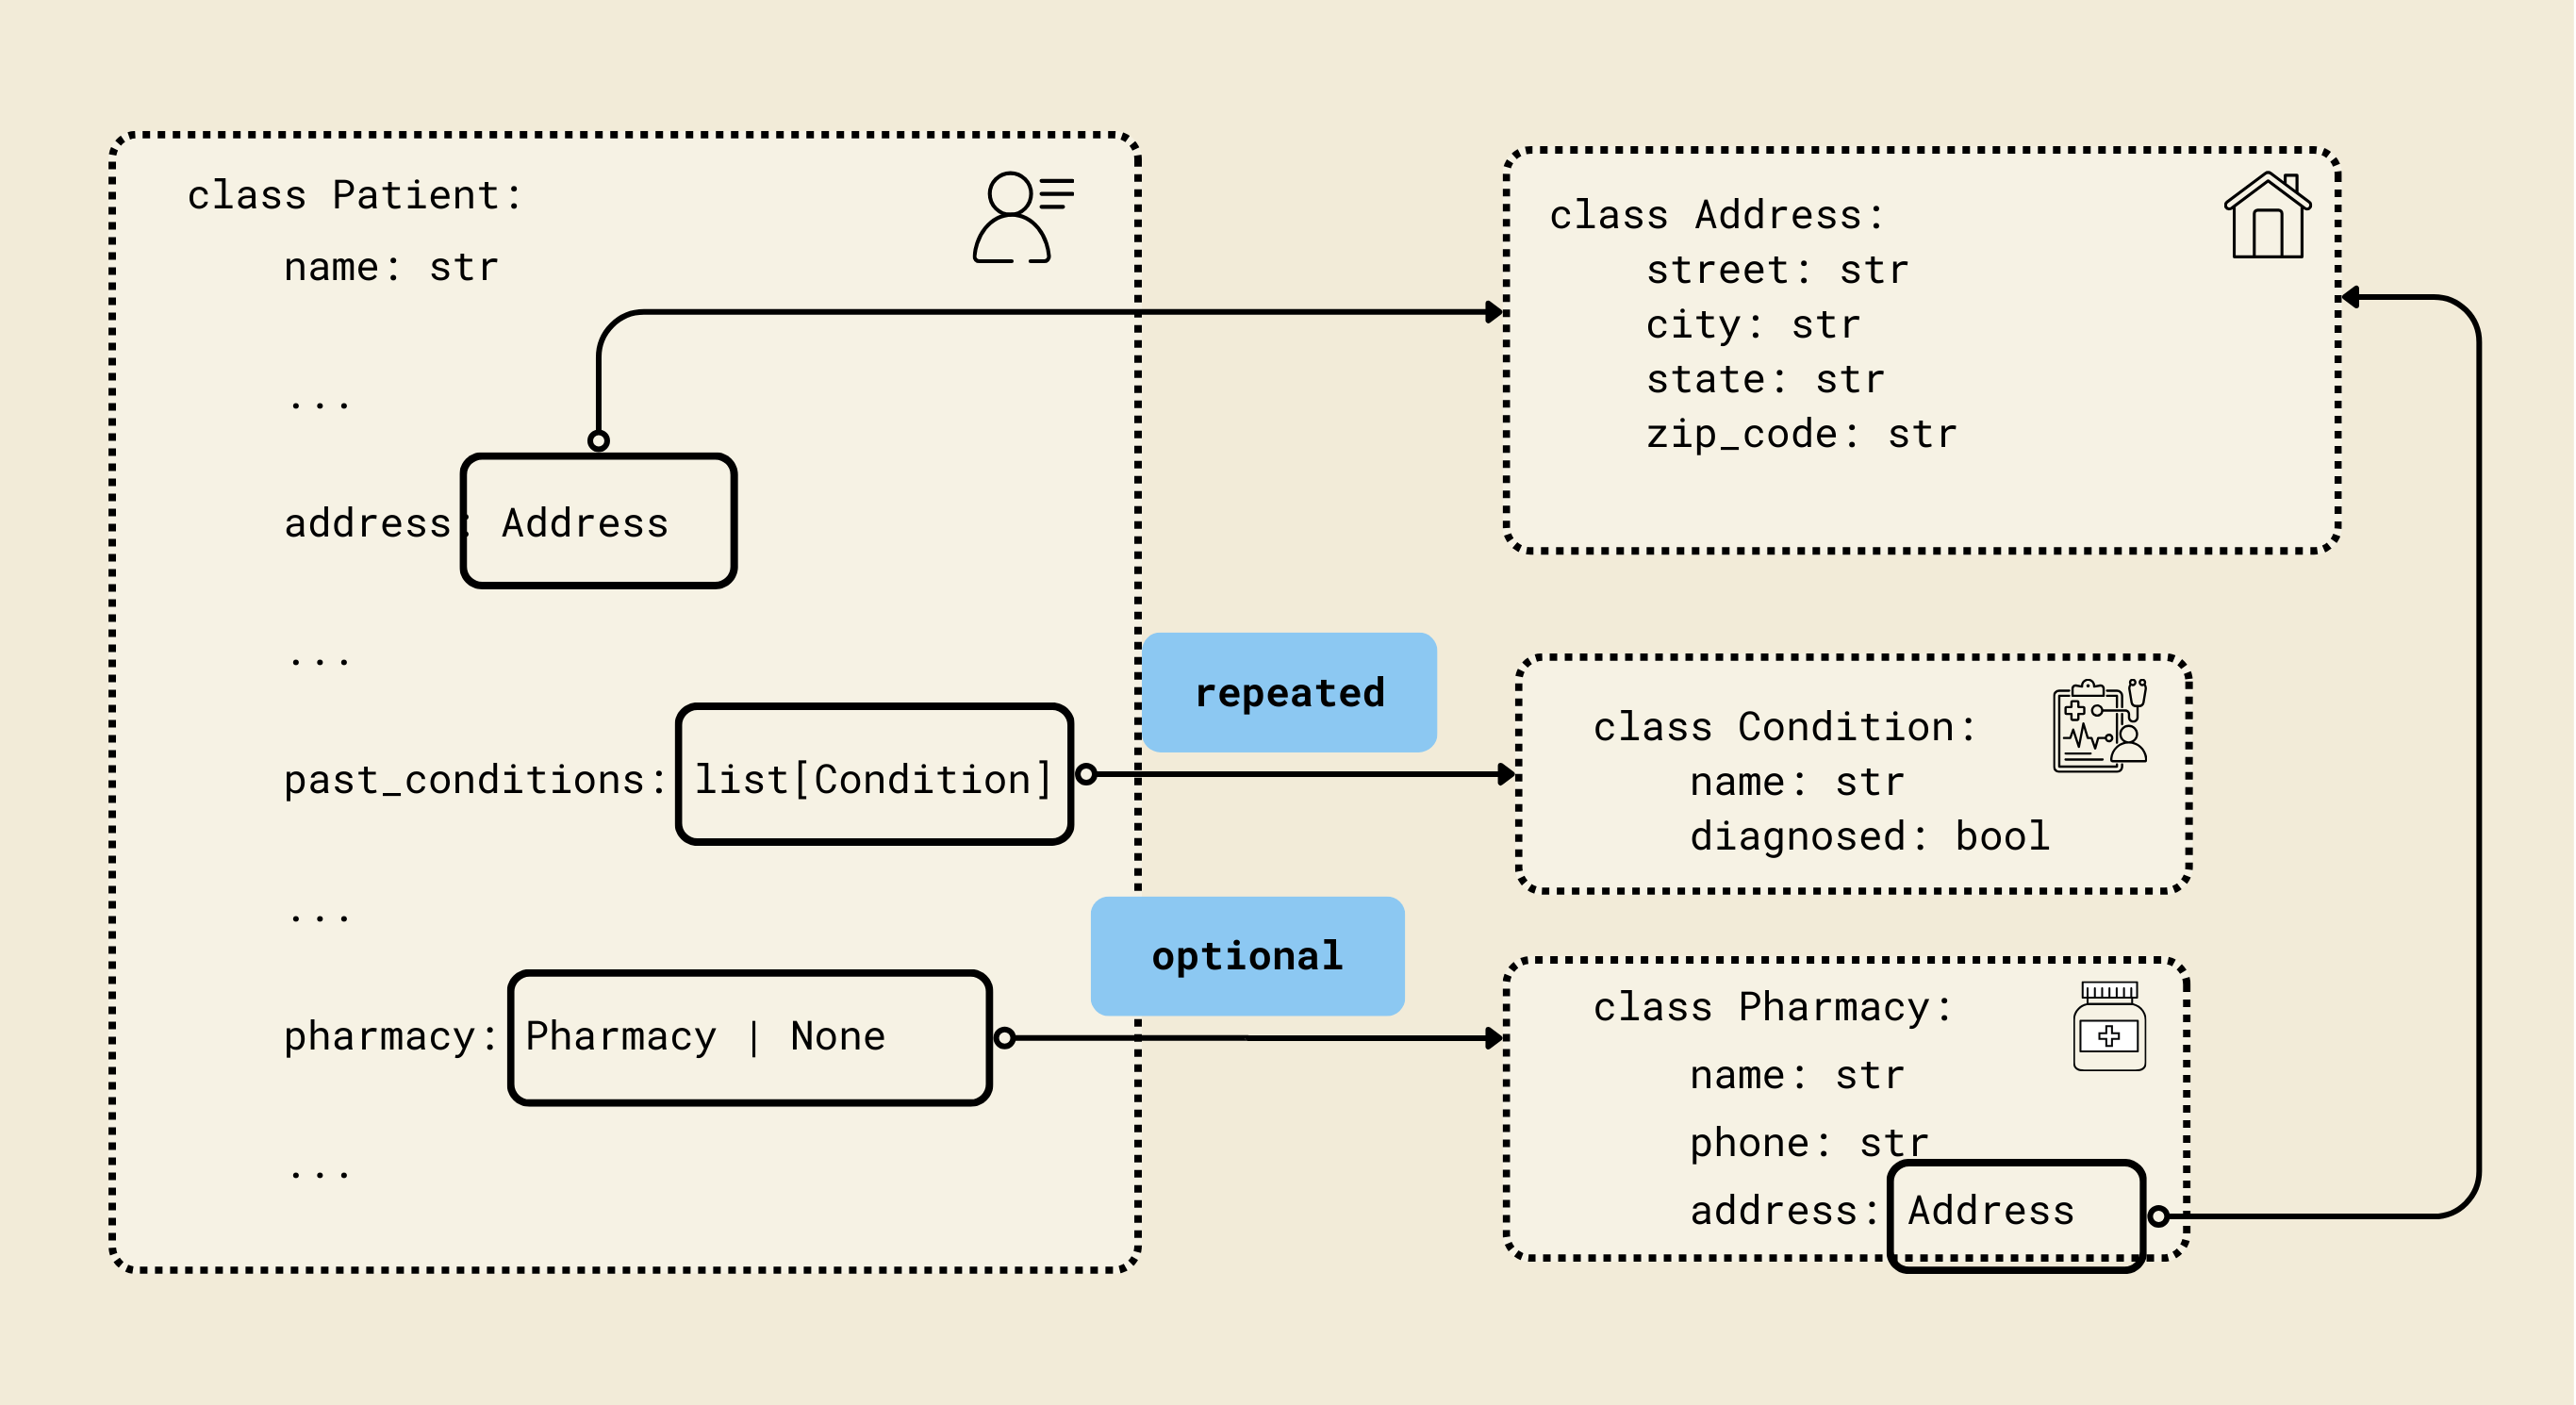
We defined Pydantic-style classes (Contact, Address, Insurance, etc.) to match a FHIR-inspired patient schema, enabling structured and validated representations of patient data. Each model corresponds to a key aspect of a patient's record, ensuring both type safety and nested relationships.
1. Contact model
class Contact(BaseModel):
    name: str
    phone: str
    relationship: str
- Represents an emergency or personal contact for the patient.
- Fields:
name: Contact's full name.phone: Contact phone number.relationship: Relation to the patient (e.g., parent, spouse, friend).
2. Address model
class Address(BaseModel):
    street: str
    city: str
    state: str
    zip_code: str
- Represents a postal address.
- Fields:
street,city,state,zip_code: Standard address fields.
3. Pharmacy model
class Pharmacy(BaseModel):
    name: str
    phone: str
    address: Address
- Represents the patient’s preferred pharmacy.
- Fields:
name: Pharmacy name.phone: Pharmacy contact number.address: Uses theAddressmodel for structured address information.
4. Insurance model
class Insurance(BaseModel):
    provider: str
    policy_number: str
    group_number: str | None = None
    policyholder_name: str
    relationship_to_patient: str
- Represents the patient’s insurance information.
- Fields:
provider: Insurance company name.policy_number: Unique policy number.group_number: Optional group number.policyholder_name: Name of the person covered under the insurance.relationship_to_patient: Relationship to patient (e.g., self, parent).
5. Condition model
class Condition(BaseModel):
    name: str
    diagnosed: bool
- Represents a medical condition.
- Fields:
name: Condition name (e.g., Diabetes).diagnosed: Boolean indicating whether it has been officially diagnosed.
6. Medication model
class Medication(BaseModel):
    name: str
    dosage: str
- Represents a current medication the patient is taking.
- Fields:
name: Medication name.dosage: Dosage information (e.g., "10mg daily").
7. Allergy model
class Allergy(BaseModel):
    name: str
- Represents a known allergy.
- Fields:
name: Name of the allergen (e.g., peanuts, penicillin).
8. Surgery model
class Surgery(BaseModel):
    name: str
    date: str
- Represents a surgery or procedure the patient has undergone.
- Fields:
name: Surgery name (e.g., Appendectomy).date: Surgery date (as a string, ideally ISO format).
9. Patient model
class Patient(BaseModel):
    name: str
    dob: datetime.date
    gender: str
    address: Address
    phone: str
    email: str
    preferred_contact_method: str
    emergency_contact: Contact
    insurance: Insurance | None = None
    reason_for_visit: str
    symptoms_duration: str
    past_conditions: list[Condition] = Field(default_factory=list)
    current_medications: list[Medication] = Field(default_factory=list)
    allergies: list[Allergy] = Field(default_factory=list)
    surgeries: list[Surgery] = Field(default_factory=list)
    occupation: str | None = None
    pharmacy: Pharmacy | None = None
    consent_given: bool
    consent_date: str | None = None
- Represents a complete patient record with personal, medical, and administrative information.
- Key fields:
name,dob,gender: Basic personal info.address,phone,email: Contact info.preferred_contact_method: How the patient prefers to be reached.emergency_contact: NestedContactmodel.insurance: Optional nestedInsurancemodel.reason_for_visit,symptoms_duration: Visit details.past_conditions,current_medications,allergies,surgeries: Lists of nested models for comprehensive medical history.occupation: Optional job info.pharmacy: Optional nestedPharmacymodel.consent_given,consent_date: Legal/administrative consent info.
Why use Pydantic here?
- Validation: Ensures all fields are the correct type (e.g.,
dobis adate). - Structured Nested Models: Patient has nested objects like
Address,Contact, andInsurance. - Default Values & Optional Fields: Handles optional fields and defaults (
Field(default_factory=list)ensures empty lists if no data). - Serialization: Easily convert models to JSON for APIs or databases.
- Error Checking: Automatically raises errors if invalid data is provided.
DSPy vision extractor
DSPy signature
Let’s define PatientExtractionSignature. A Signature describes what data your module expects and what it will produce. Think of it as a schema for an AI task.
PatientExtractionSignature is a dspy.Signature, which is DSPy's way of declaring what the model should do, not how it does it.
# DSPy Signature for patient information extraction from images
class PatientExtractionSignature(dspy.Signature):
    """Extract structured patient information from a medical intake form image."""

    form_images: list[dspy.Image] = dspy.InputField(
        desc="Images of the patient intake form pages"
    )
    patient: Patient = dspy.OutputField(
        desc="Extracted patient information with all available fields filled"
    )
This signature defines task contract for patient information extraction.
- Inputs:
form_images– a list of images of the intake form. - Outputs:
patient– a structuredPatientobject.
From DSPy's point of view, this Signature is a "spec": a mapping from an image-based context to a structured, Pydantic-backed semantic object that can later be optimized, trained, and composed with other modules.
PatientExtractor module
PatientExtractor is a dspy.Module, which in DSPy is a composable, potentially trainable building block that implements the Signature.
class PatientExtractor(dspy.Module):
    """DSPy module for extracting patient information from intake form images."""

    def __init__(self) -> None:
        super().__init__()
        self.extract = dspy.ChainOfThought(PatientExtractionSignature)

    def forward(self, form_images: list[dspy.Image]) -> Patient:
        """Extract patient information from form images and return as a Pydantic model."""
        result = self.extract(form_images=form_images)
        return result.patient  # type: ignore
- In
__init__,ChainOfThoughtis a DSPy primitive module that knows how to call an LLM with reasoning-style prompting to satisfy the given Signature. In other words, it is a default "strategy" for solving the "extract patient from images" task. - The
forwardmethod is DSPy's standard interface for executing a module. You passform_imagesintoself.extract(). DSPy then handles converting this call into an LLM interaction (or a trained program) that produces apatientfield as declared in the Signature.
Conceptually, PatientExtractor is an ETL operator: the Signature describes the input/output types, and the internal ChainOfThought module is the function that fills that contract.
Single-step extraction
Now let’s wire the DSPy Module to extract from a single PDF. From high level,
- The extractor receives PDF bytes directly
- Internally converts PDF pages to DSPy Image objects using PyMuPDF
- Processes images with vision model
- Returns Pydantic model directly
@cocoindex.op.function(cache=True, behavior_version=1)
def extract_patient(pdf_content: bytes) -> Patient:
    """Extract patient information from PDF content."""

    # Convert PDF pages to DSPy Image objects
    pdf_doc = pymupdf.open(stream=pdf_content, filetype="pdf")

    form_images = []
    for page in pdf_doc:
        # Render page to pixmap (image) at 2x resolution for better quality
        pix = page.get_pixmap(matrix=pymupdf.Matrix(2, 2))
        # Convert to PNG bytes
        img_bytes = pix.tobytes("png")
        # Create DSPy Image from bytes
        form_images.append(dspy.Image(img_bytes))

    pdf_doc.close()

    # Extract patient information using DSPy with vision
    extractor = PatientExtractor()
    patient = extractor(form_images=form_images)

    return patient  # type: ignore
This function is a CocoIndex function (decorated with @cocoindex.op.function) that takes PDF bytes as input and returns a fully structured Patient Pydantic object.
cache=Trueallows repeated calls with the same PDF to reuse results.behavior_version=1ensures versioning of the function for reproducibility.
Create DSPy image objects
We open PDF from bytes using PyMuPDF (pymupdf), then we iterate over each page.
- Useful trick: Render the page as a high-resolution image (
2x) for better OCR/vision performance. - Convert the rendered page to PNG bytes.
- Wrap the PNG bytes in a DSPy
Imageobject.
DSPy extraction
The list of form_images is passed to the DSPy module:
- ChainOfThought reasoning interprets each image.
- Vision + NLP extract relevant text fields.
- Populate Pydantic
Patientobject with structured patient info.
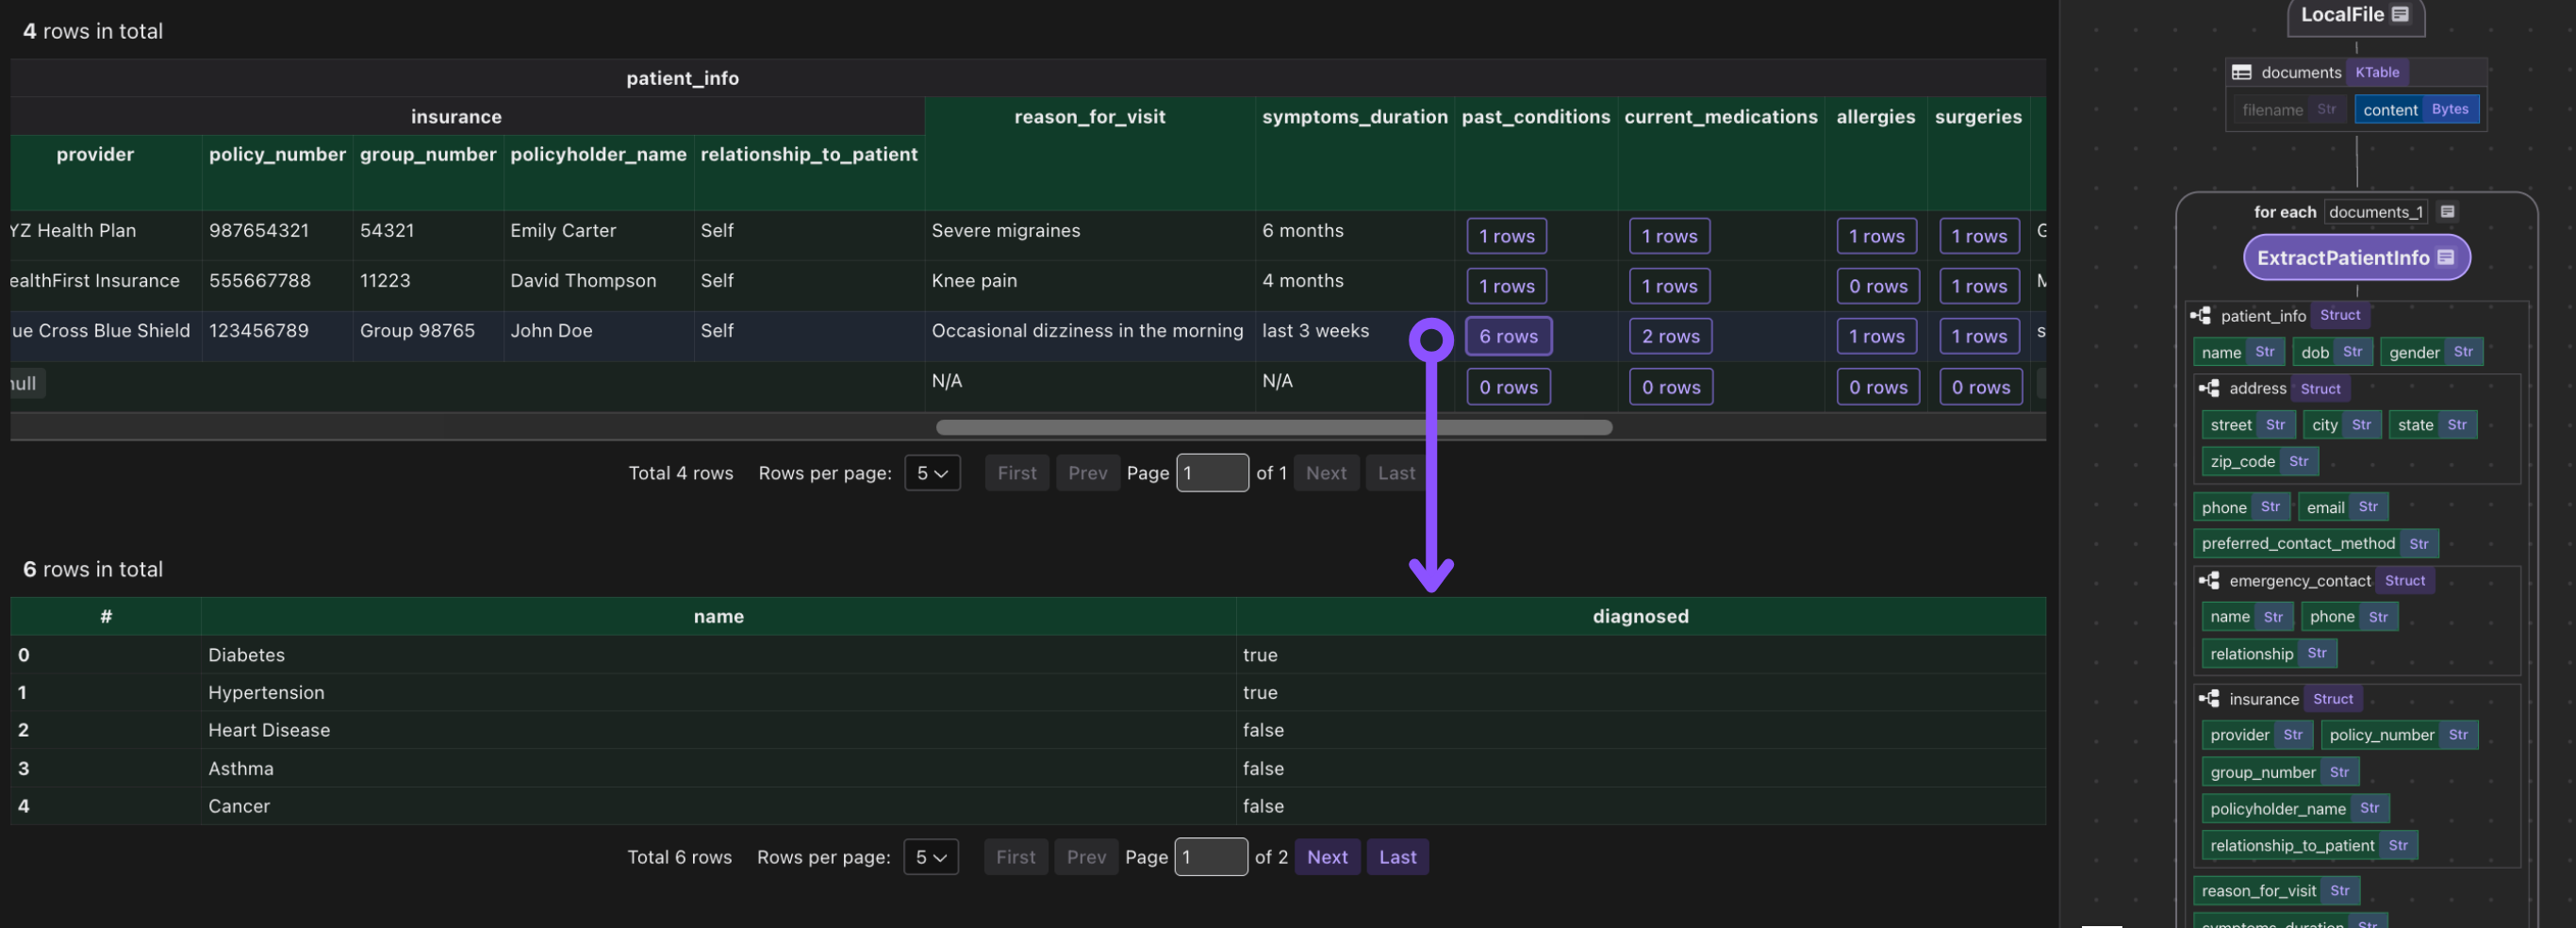
CocoIndex flow
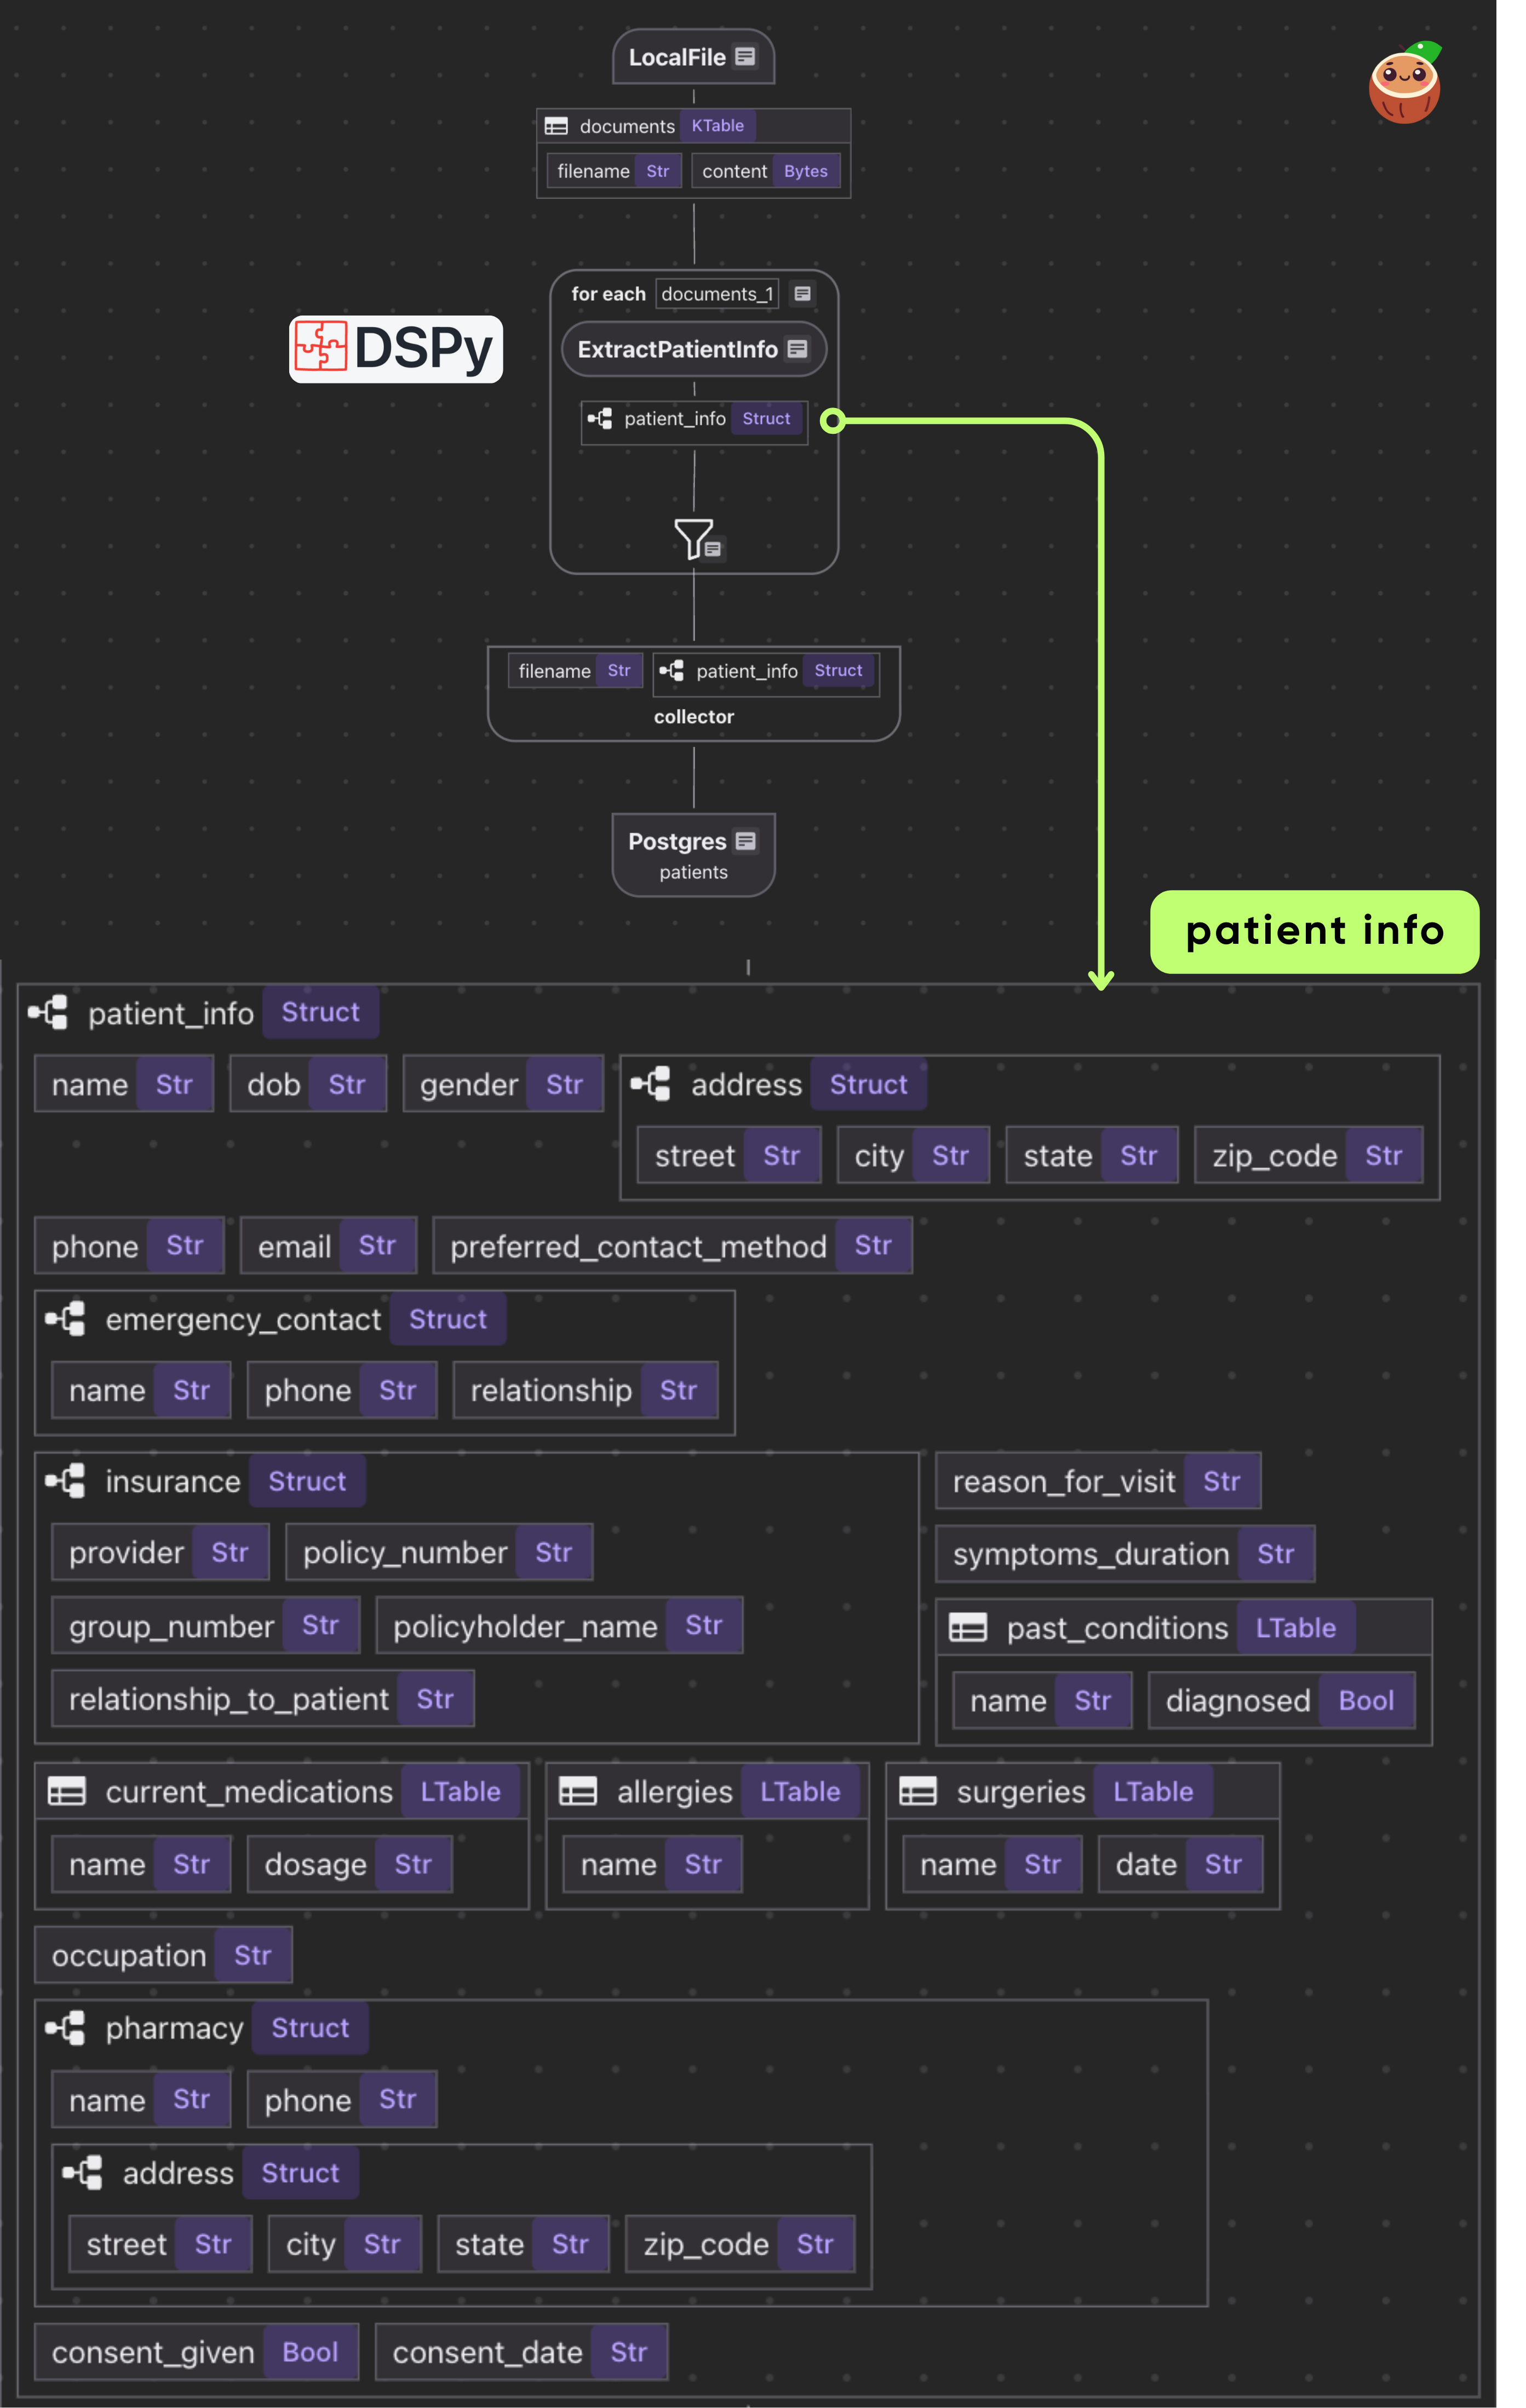
- Loads PDFs from local directory as binary
- For each document, applies single transform: PDF bytes → Patient data
- Exports the results in a PostgreSQL table
Declare flow
Declare a CocoIndex flow, connect to the source, add a data collector to collect processed data.
@cocoindex.flow_def(name="PatientIntakeExtractionDSPy")
def patient_intake_extraction_dspy_flow(
    flow_builder: cocoindex.FlowBuilder, data_scope: cocoindex.DataScope
) -> None:
    data_scope["documents"] = flow_builder.add_source(
        cocoindex.sources.LocalFile(path="data/patient_forms", binary=True)
    )

    patients_index = data_scope.add_collector()
@cocoindex.flow_deftells CocoIndex that this function is a flow definition, not regular runtime code.add_source()registers aLocalFilesource that traversesdata/patient_formsdirectory and creates a logical table nameddocuments
You can connect to various sources, or even custom source with CocoIndex if native connectors are not available. CocoIndex is designed to keep your indexes synchronized with your data sources. This is achieved through a feature called live updates, which automatically detects changes in your sources and updates your indexes accordingly. This ensures that your search results and data analysis are always based on the most current information. You can read more here https://cocoindex.io/docs/tutorials/live_updates
Process documents
with data_scope["documents"].row() as doc:
    # Extract patient information directly from PDF using DSPy with vision
    # (PDF->Image conversion happens inside the extractor)
    doc["patient_info"] = doc["content"].transform(extract_patient)

    # Collect the extracted patient information
    patients_index.collect(
        filename=doc["filename"],
        patient_info=doc["patient_info"],
    )
This iterates over each document. We transform doc["content"] (the bytes) by our extract_patient function. The result is stored in a new field patient_info.
Then we collect a row with the filename and extracted patient_info.
Export to Postgres
patients_index.export(
    "patients",
    cocoindex.storages.Postgres(table_name="patients_info_dspy"),
    primary_key_fields=["filename"],
)
We export the collected index to Postgres. This will create/maintain a table patients keyed by filename, automatically deleting or updating rows if inputs change.
Because CocoIndex tracks data lineage, it will handle updates/deletions of source files incrementally.
Configure CocoIndex settings
Define a CocoIndex settings function that configures the AI model for DSPy:
@cocoindex.settings
def cocoindex_settings() -> cocoindex.Settings:
    # Configure the model used in DSPy
    lm = dspy.LM("gemini/gemini-2.5-flash")
    dspy.configure(lm=lm)

    return cocoindex.Settings.from_env()
It returns a cocoindex.Settings object initialized from environment variables, enabling the system to use the configured model and environment settings for all DSPy operations.
Running the pipeline
Update the index:
cocoindex update main
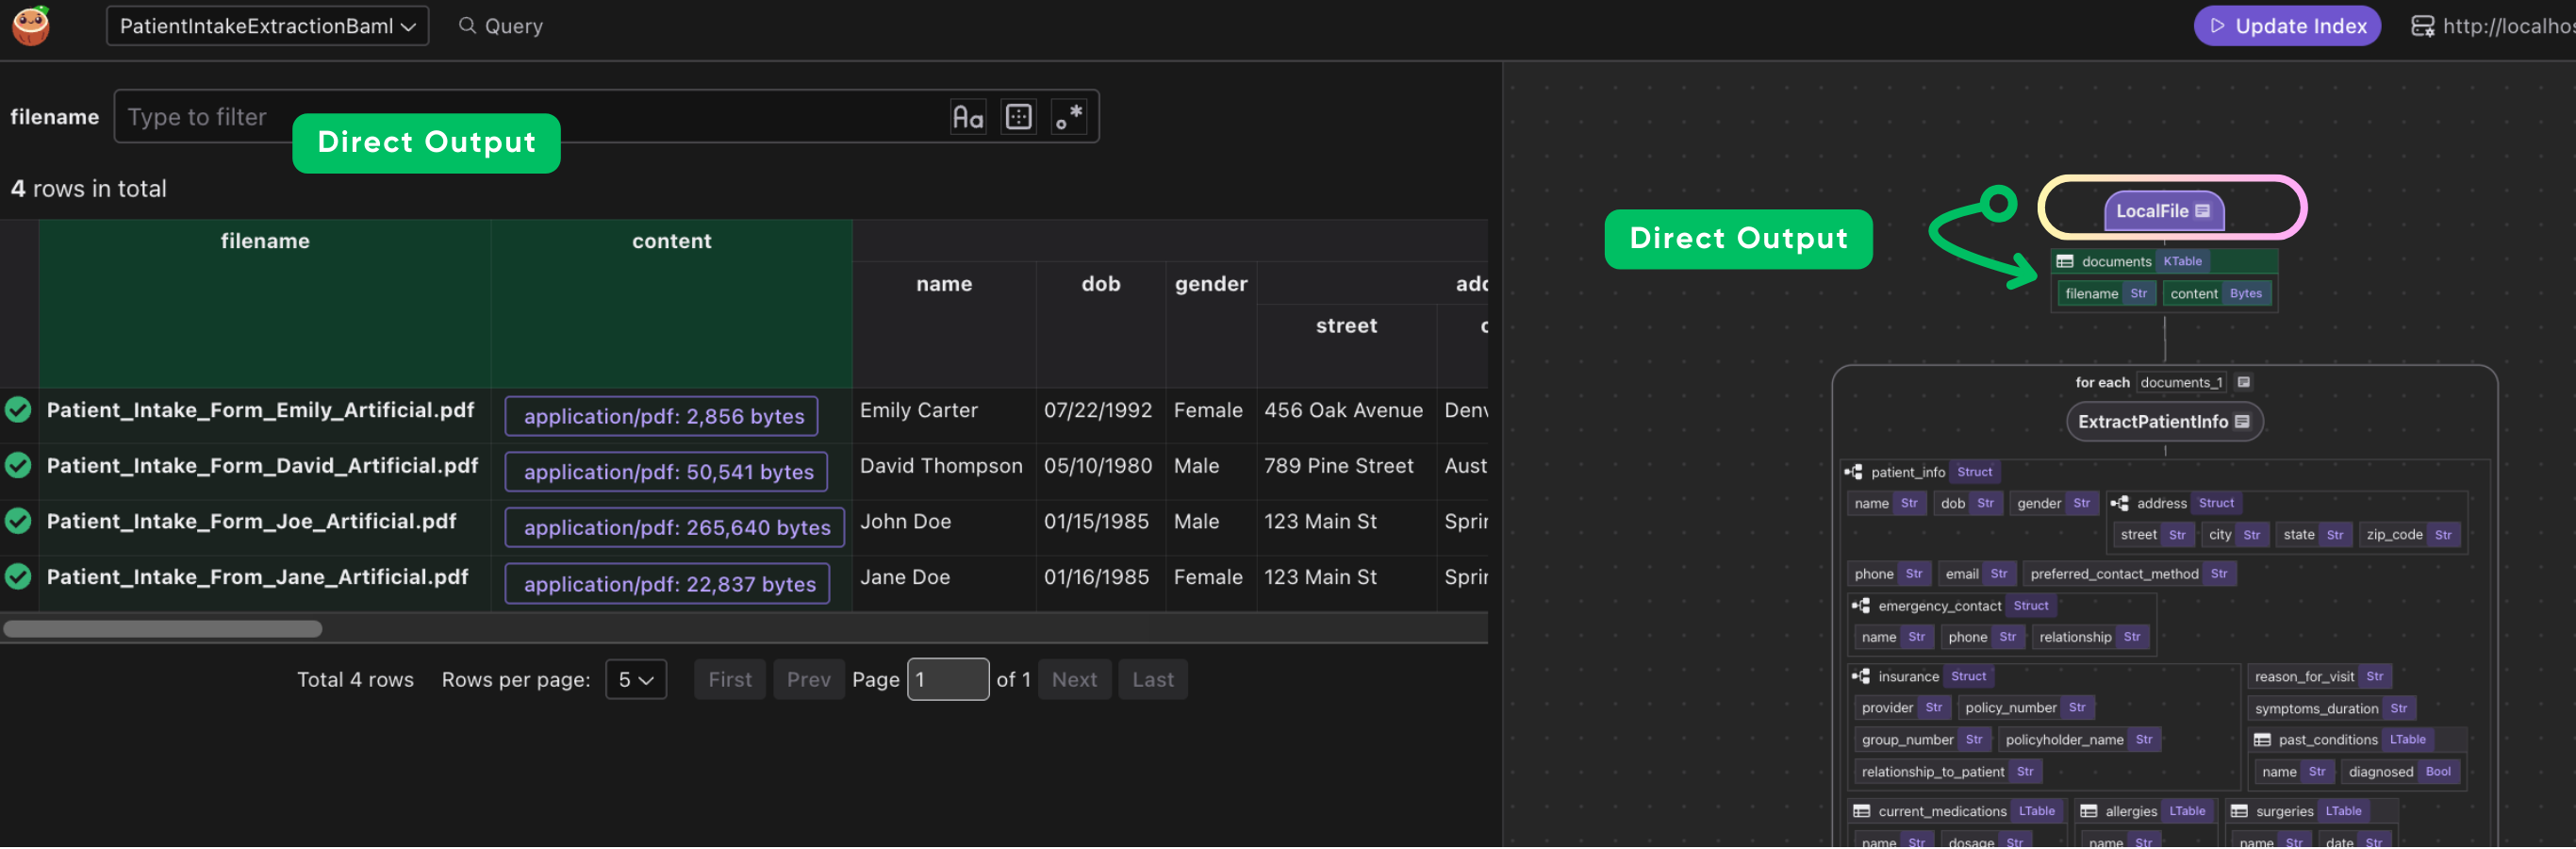
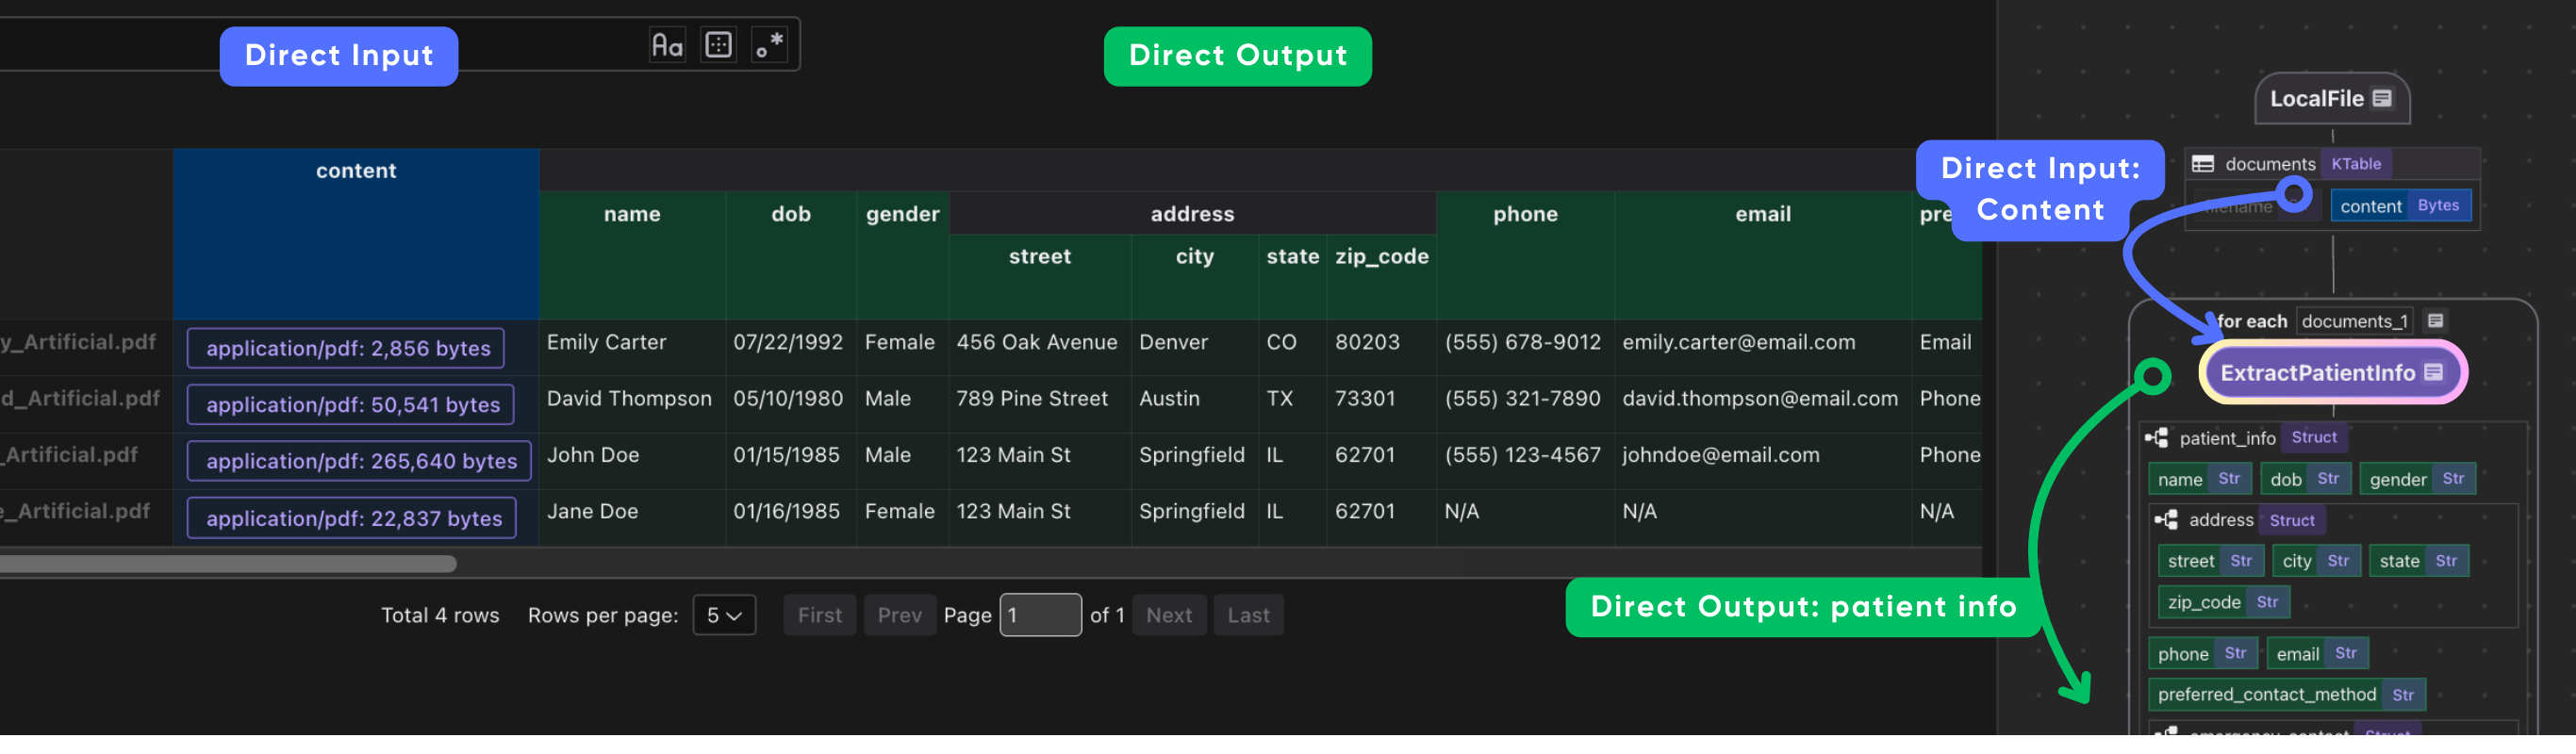
CocoInsight
I used CocoInsight (Free beta now) to troubleshoot the index generation and understand the data lineage of the pipeline. It just connects to your local CocoIndex server, with zero pipeline data retention.
cocoindex server -ci main
Scalable open ecosystem, not a closed box
CocoIndex is intentionally "composable by default": it gives you a fast, incremental data engine and clean flow, abstraction, but never locks you into a specific model, vector DB, processing module or orchestration stack.
CocoIndex treats everything — sources, ops, and storages — as pluggable interfaces rather than proprietary primitives. You can read from local files, S3, APIs, or custom sources, call any data transformation logic (beyond SQL, DSPy modules, any complex Python transformations, generated parsers etc), and export to relational databases, vector databases, search engines, or custom sinks through its storage layer.
Why DSPy + CocoIndex fits this philosophy
DSPy is itself a compositional framework for LLMs: you define typed Signatures and Modules, and it learns how to implement them, making the LLM layer programmable, testable, and optimizable.
CocoIndex treats these modules as first-class operators in the flow, so you get a clean separation of concerns: DSPy owns “how the model thinks,” while CocoIndex owns “how data moves, is cached, and is served” across changing PDFs, code, or APIs.
This pairing is powerful because neither system tries to be the entire stack: CocoIndex does not prescribe a prompt framework, and DSPy does not prescribe a data pipeline engine. Instead, they interlock: DSPy modules become composable building blocks inside CocoIndex flows, and CocoIndex gives those modules a production context with retries, batching, caching, and live updates.
Comparison of DSPy vs BAML examples
For this DSPy and BAML example with CocoIndex, there are some differences in the data flow and the schema enforcement.
| Aspect | This tutorial (DSPy) | Previous intake tutorials (OpenAI/BAML) |
|---|---|---|
| Model interaction | DSPy Signatures + Modules, trainable and optimizable. | Direct prompts or BAML functions with generated clients. |
| Input format | PDF bytes → images → Gemini Vision (no Markdown step). | PDF/DOCX → Markdown via parsers (e.g., MarkItDown) → text LLM. |
| Schema enforcement | Pydantic models used directly as DSPy output types. | Dataclasses or BAML types mapped into CocoIndex collectors. |
| Pipeline engine | CocoIndex incremental flow with LocalFile source + Postgres sink. | Same engine |
DSPy and BAML both help build LLM applications with structured outputs, but they emphasize different things: DSPy focuses on modular Python workflows and optimizer-driven prompt tuning, while BAML focuses on a typed DSL, schema guarantees, and multi-language client generation.
Support CocoIndex ❤️
If this example was helpful, the easiest way to support CocoIndex is to give the project a ⭐ on GitHub.
Your stars help us grow the community, stay motivated, and keep shipping better tools for real-time data ingestion and transformation.